Is it possible to make it complete with no-code tools?
Why do I try this?
Google Sheets is an amazing app for all business persons, especially for system administrators working in small businesses. It is very well suited for managing data within their company.
However, especially in small businesses, even Google Sheets is also difficult for normal employees to use. (Needless to say, Excel is too.)
So I have been researching tools or services that make it easier for the employees to use Google Sheets.
Eventually, I found good solutions for this — no-code tools. So I’d like to try out some of these services.
About Glide
“Glide” is a no-code tool that communicates with your Google Sheets and helps you to make your apps very easy.
I found a good explanation about its features:
Beautiful by default: Glide is designed to make every app look polished and familiar. Customize your app with a library of prebuilt components that you easily drag, drop, and connect to data.
No code: All you need is a spreadsheet. Glide gives you powerful computed columns that make spreadsheet logic a breeze. Link between sheets, look up data, perform calculations, and write conditional statements in just a few clicks, without a single formula or line of code.
Share with a link: That’s how easy it is to share your app cross-device with anyone, anywhere. You can also share apps by scanning the QR code with your phone’s camera.
Templates: Quickly clone and customize 100s of ready-to-go templates for every use case.
About the sample app
For examining Glide’s potential capabilities, I make a straightforward sample app. The app is about viewing and writing work reports, something like building maintenance workers can use. ( but for the purpose, it’s very simple 😅 )
The design and structure are as follows.
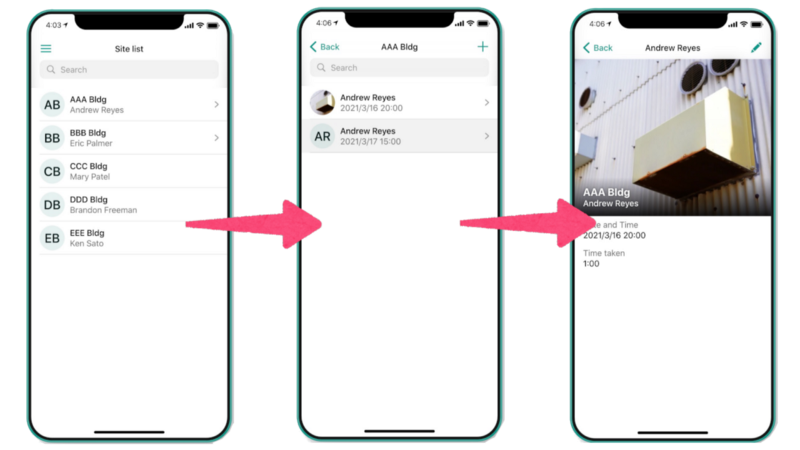
Screens
- Site list
It shows the sites those an employee is in charge. When you select a site, the next screen will appear. - Report list
Shows the reports of the site you selected. And you can add or edit or delete reports. The report can include a photo that you take.
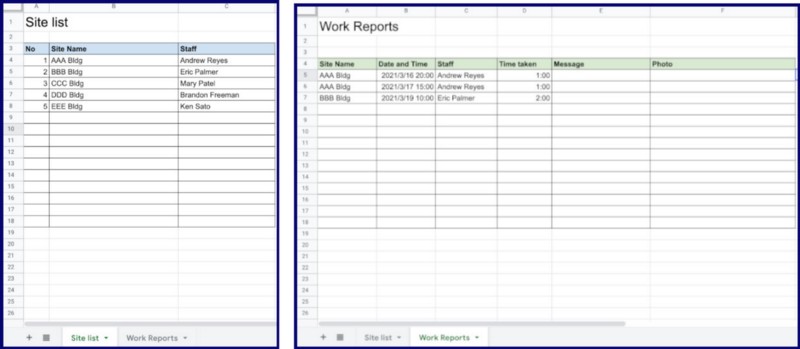
Data structure
In Glide, spreadsheets are similar to tables of RDB. In the beginning, I wanted to make report spreadsheets divided by sites, but Glide can not associate one spreadsheet with such multiple spreadsheets, so I decided to make those into one sheet😥. Two spreadsheets are in response to the above two screens.
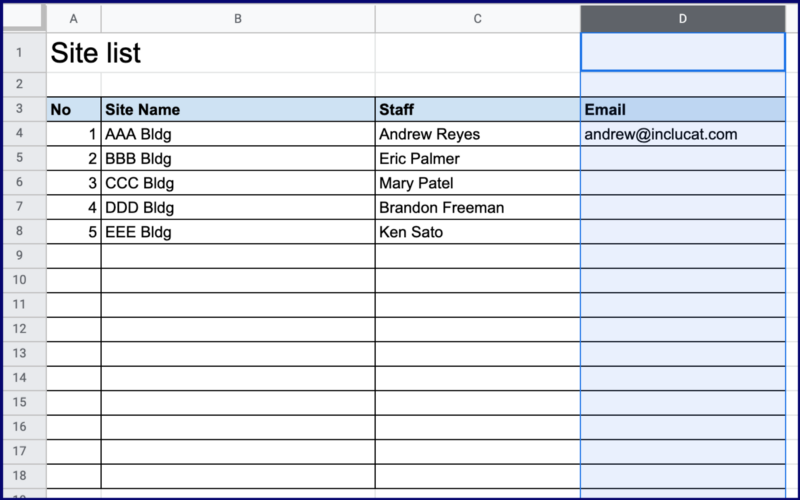
- Site list
Expresses information of the sites and their staff. - Report list
Expresses work reports of the sites.
Note: You should let the sheets have at least one record. Otherwise you’ll not be able to design the sheets.
How you can build it
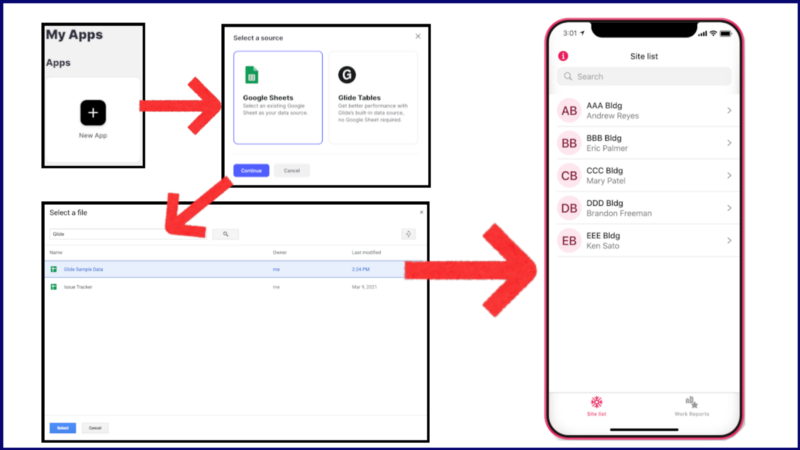
Create a new app
- On your Glide’s dashboard page, select “New App” and then select “Google Sheets” as a source.
- On the “Select a file” dialog, you can select the spreadsheet that contains the two lists I mentioned.
- Then Glide will build a beautiful default app. Amazing!
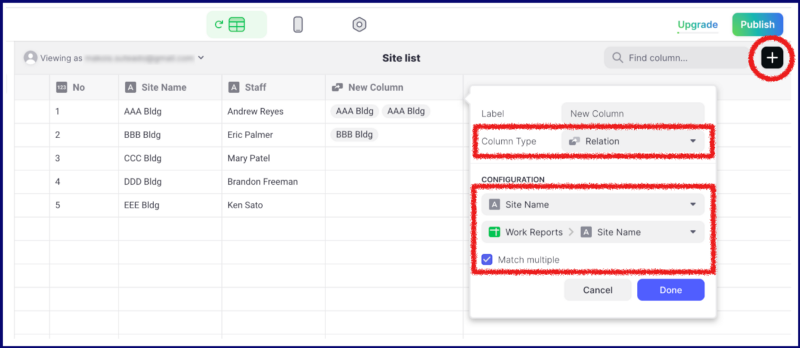
Make a relation between the Site list and the Report list
To show the Report list screen when you select a site, you should make a relation. In this case, it becomes “Multiple Relation” because a site can have many reports.
- Go to the datasheet page of “Site list”, then click the plus button located at the right top.
- Change the value of “Column Type” to “Relation” and check “Match multiple”, then click “Done”.
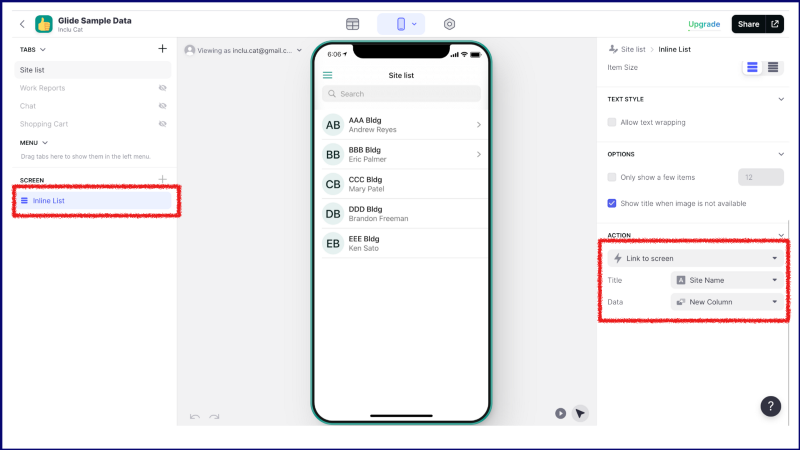
- Go back to the design page, select “Inline List” located at the left pane.
- Change the value of “Action” (located at the right pane) to “Link to Screen” and set “Site Name” for “Title”. Then set “New Column”( added at 2. ) for “Data”.
- Then you’ll see the “Report list” screen that contains reports of the selected site when you select a site on the “Site List” screen.
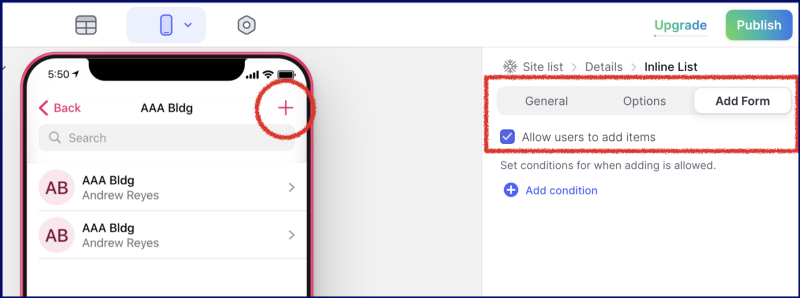
Make Report list screen able to add new records
- On the “Site list” screen, after selecting any site ( so now you see “Report list”), select “Inline List” located at the left pane.
- Select “Add Form” located at the right pane. Then check “Allow users to items”.
- Then plus button will appear at the top right. When you click the plus button, the “New item” form will show. ( Now you can add a new record )
Note: Users should input a correct “Site Name” when they add a new item. I think there should be a feature that automatically inputs the correct “Site Name”, but I couldn’t find an easy way.
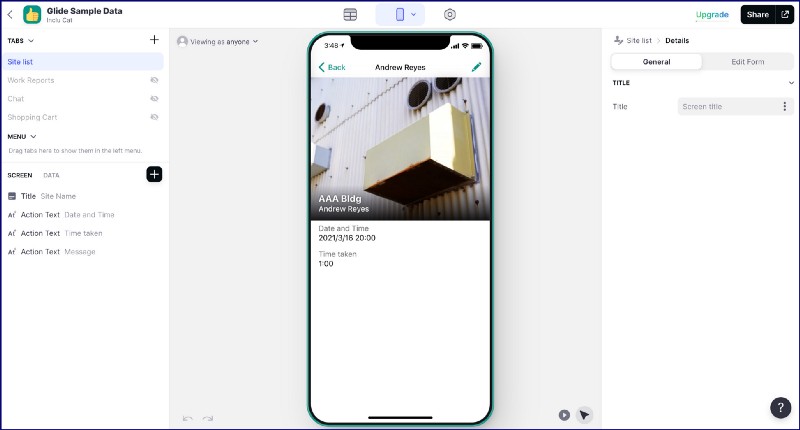
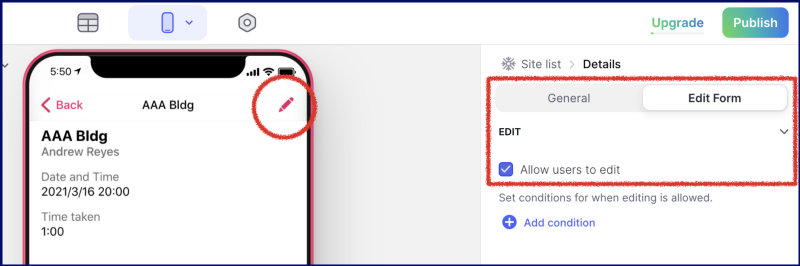
Make Report list screen able to edit and delete
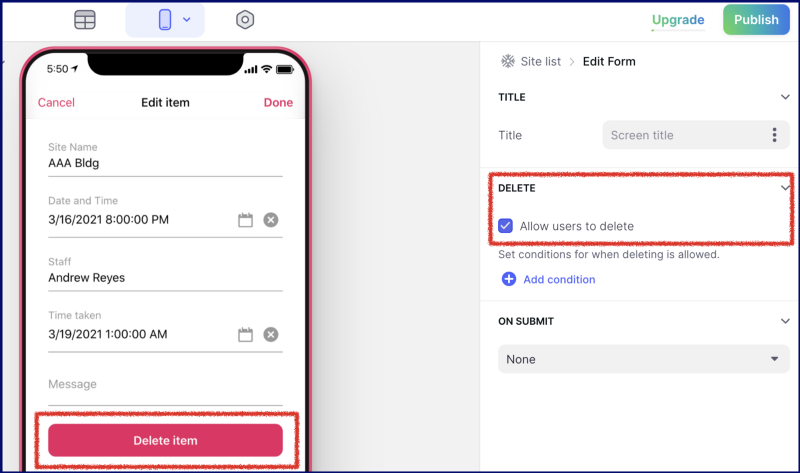
- On the “Site list” screen, after selecting any report ( so now you see a report detail screen), select “Edit form” located at the right pane. Then check “Allow users to edit”.
- Then pencil button will appear at the top right. When you click the button, the “Edit item” form will show. ( Now you can edit it )
- Check “Allow users to delete” so that you’ll see a “Delete item” button on the bottom. ( Now you can delete it )
Support photo upload
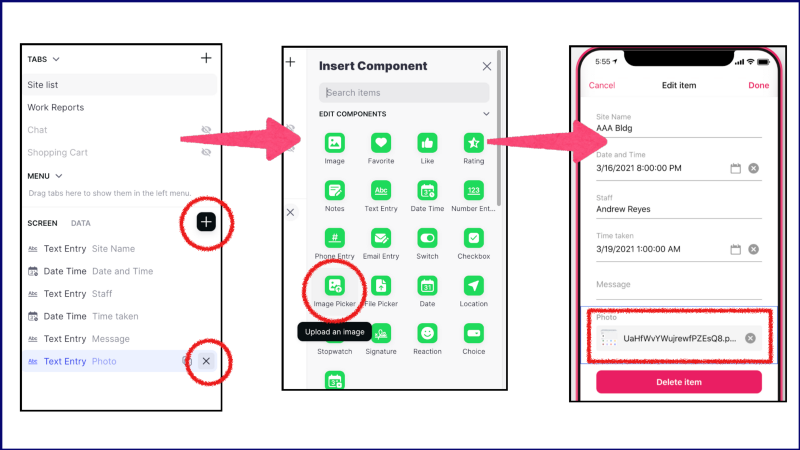
- Next, select “Text entry” of “photo” located at the left pane, then click the cross button so that you’ll delete the field.
- Click the plus button located at the right side of the “SCREEN” pane, and click the “Image Picker” button. Now you can upload an image for the item.
- If you upload an image by the Image Picker button, you’ll find a photo content URL in your report spreadsheet. It is a link to the photo image stored in Google Cloud Storage.
Note: Glide seems not to have any method to store images in your own Google Drive Storage.
Filter displayed sites for each user
For now, an employee can see any site despite whether he is in charge of that or not.
To filter displayed sites for each user, you should use “Row Owners”.
- To do this, we add a column ( named “Email” ) that contains individual emails to the “Site list” by using Google Sheets. And input an email address for the test.
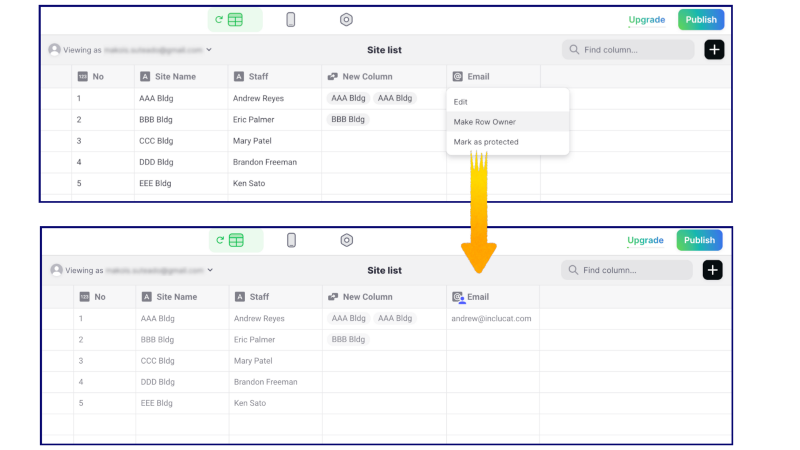
- Turn to Glide, go to the datasheet page of “Site list”, then click the drop-down button within the “Email” column header.
- Select “Make Row Owner” to enable filtering.
- Return to the design page, and you’ll no longer see any site in the “Site list” screen because the current user is not correct.
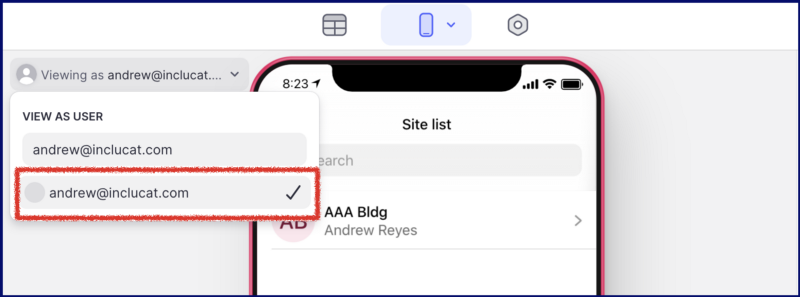
- Click the “Viewing as …“ drop-down and input the correct user’s email address. Then you’ll see some sites that the user owns.
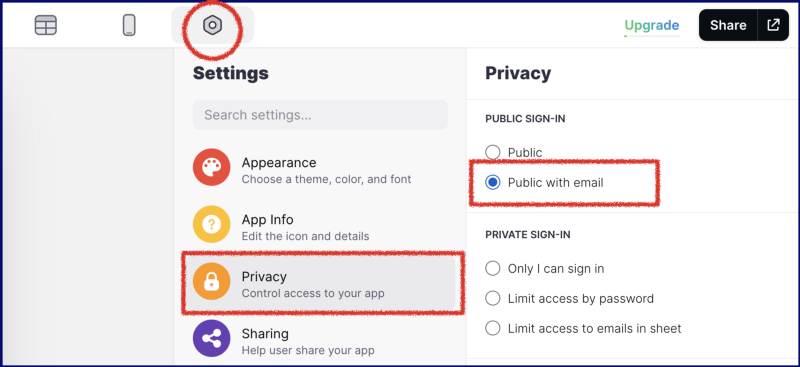
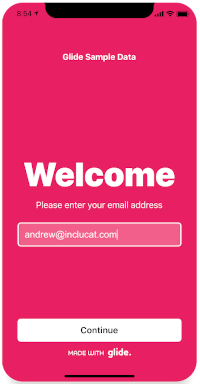
- When you enable “Row Owners”, you should change the privacy configuration. So go to the settings page and change “PUBLIC SIGN-IN” to “Public with email”. By doing this, the app home screen is changed to the login page. ( you’ll see it after publishing the app. )
Other things
- There is another “Work Reports” screen that is unnecessary. So click the eye icon of the screen to be invisible.
- Because the “Work Reports” screen doesn’t show appropriate information, so change the “DATA” section to show “Staff” and “Date and Time”.
Publish the app
It is effortless to publish the app. Click the “Publish” button located at the right top, click “Publish app”, done!

If you access the app page, the login screen will be shown. After logged in, you can use the app and see your sites ( if you have permission from the site ).
Conclusion
“Glide” is a great tool for very easily building apps with Google Sheets. And the published app is so beautiful, looking like a product created by a professional designer. There are so many customizing ways that you can create your app that meets your needs.
But similar to any other tools, I recognized that even Glide has some drawbacks.
Restricted relation
I expected Glide has a way that one spreadsheet has relation with multi spreadsheets, but it doesn’t. In many cases, work reports are divided by each site, so if you use Glide and have to make something like printable reports, you have to get another mechanism for it.
Privacy issue
It should be a public app as long as your plan is free. Using “Row Owners” can protect the data from people out of the company, but the official video says, “ try not to rely on filtering for confidential data”. So there is a potential privacy issue.
If you want the app to be private, you should choose the “Private Pro App” plan that takes $40 per month. ( For 20 users. +$2 per extra user )
Data storage for photos
I wished that photos of the report are stored in my own Google Drive storage, but they stored Google Cloud Storage that Glide owns. It doesn’t seem easy to operate flexibly with the photos taken.
Glide is a great supporter for system administrators working in small businesses despite some issues. I strongly recommend trying it with a simple app. I hope this article is helpful for you!
No responses yet