
Is it possible to make it complete with no-code tools?
Why do I try this?
Google Sheets is an amazing app for all business persons, especially for system administrators working in small businesses. It is very well suited for managing data within their company.
However, especially in small businesses, even Google Sheets is also difficult for normal employees to use. (Needless to say, Excel is too.)
So I have been researching tools or services that make it easier for the employees to use Google Sheets.
Eventually, I found good solutions for this — no-code tools. So I’d like to try out some of these services.
I have already written about Glide. This time I would like to write about AppSheet.
About AppSheet
AppSheet is a no-code tool that allows users to create mobile, tablet, and web applications using data sources like Google Drive, DropBox, Office 365, and other cloud-based spreadsheet and database platforms.
Google acquired AppSheet in January 2020.
About the sample app
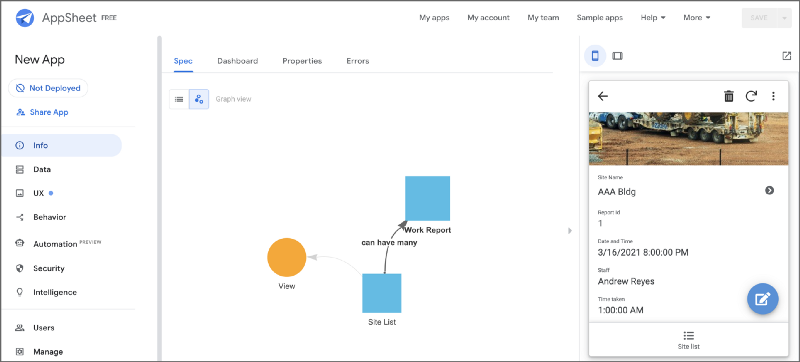
For examining AppSheet’s potential capabilities, I make a straightforward sample app. The app is about viewing and writing work reports, something like building maintenance workers can use. ( but for the purpose, it’s straightforward 😅 )
The design and structure are as follows.
Screens
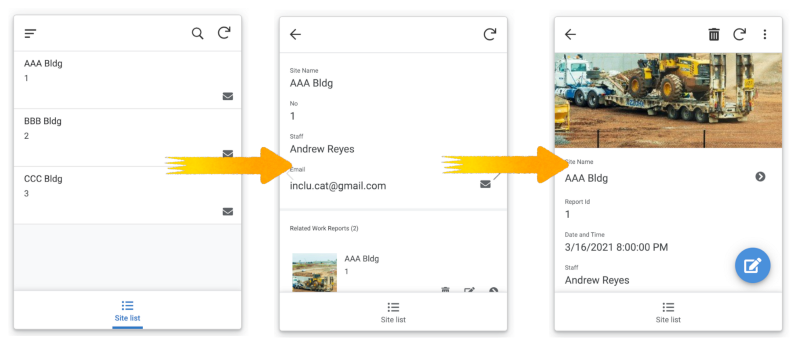
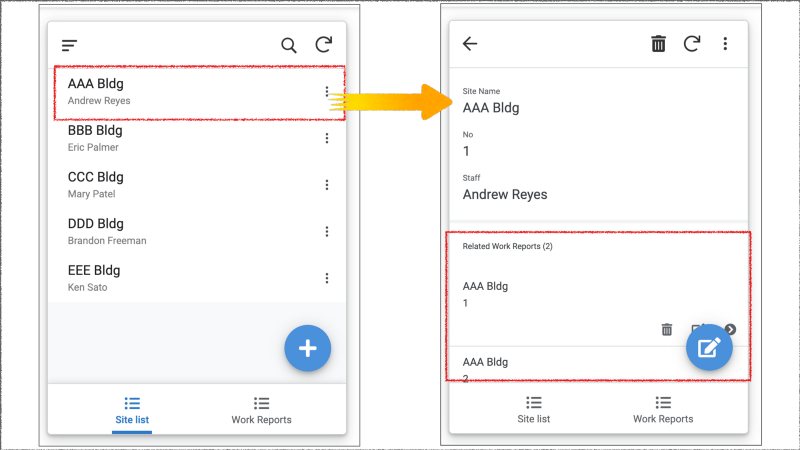
- Site list
It shows the sites those an employee is in charge. When you select a site, the next screen will appear. - Report list
Shows the reports of the site you selected. And you can add or edit or delete reports. The report can include a photo that you take.
Data structure
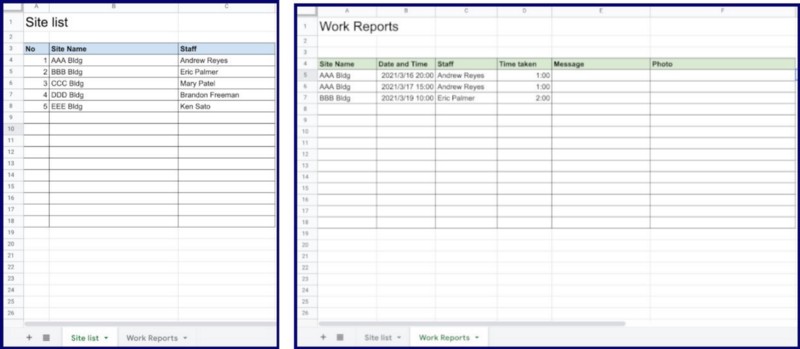
In AppSheet, spreadsheets are similar to tables of RDB. Like Glide, AppSheet can not associate one spreadsheet with multiple spreadsheets with the same structure. I made two spreadsheets that are in response to the above two screens.
- Site list
Expresses information of the sites and their staff. - Report list
Expresses work reports of the sites.
How you can build it
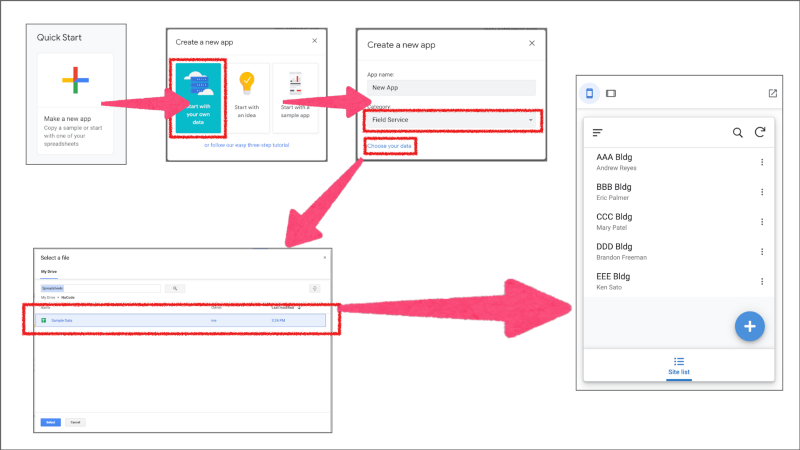
- On your AppSheet’s dashboard page, click “Make a new app” and then select “Start with your own data”. And then select a category, for example, “Field Service”. Click “Choose your data”.
- On the “Select a file” dialog, you can select the spreadsheet that contains the two lists I mentioned.
- Then AppSheet will build an appropriate default app. Great!
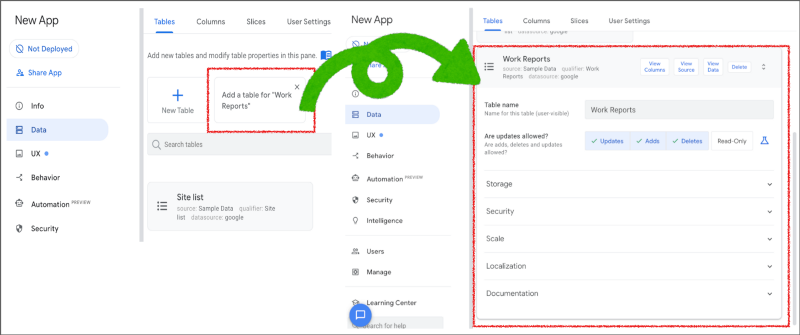
Add Work Report Sheet
Unlike Glide, AppSheet imports only one sheet from a data source. So you need to add another sheet. Let’s click “Add a table for “Work Reports” ”.
Make a relation between the Site list and the Report list
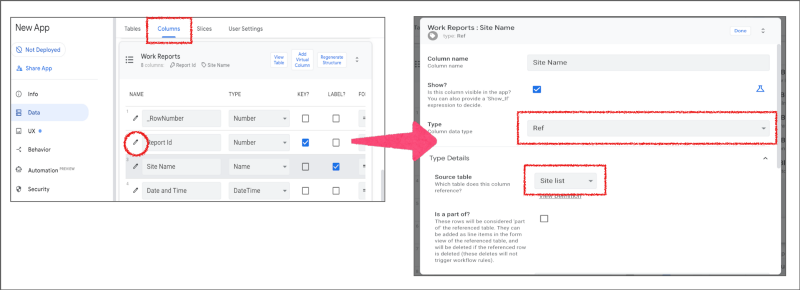
To show the Report list screen when you select a site, you need to make a Reference.
- In the Data section, click the Column tab and select Work Reports.
- Click the pencil mark to the far left of “Site Name”.
- In the Type dropdown, select Ref.
- In the Source table dropdown, select the referenced table.
- Click Done.
- Save the changes.
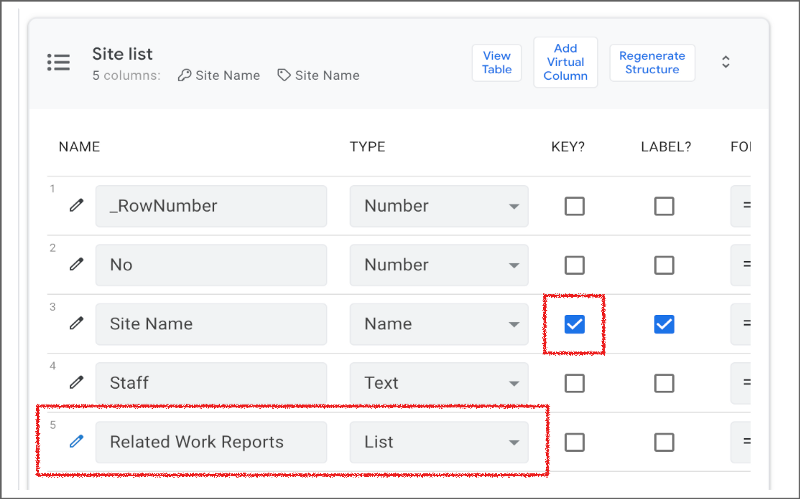
If you see the Site list columns, you’ll see System-Added Reverse Reference. In this case, it is named Related Work Reports. This Reference Column contains related Work Report records’ key values.
Note: It seems that the Reference Column of the parent table should be a KEY column. Otherwise, you’ll never see related Work Report records when you select a Site List record. I wonder why it is required.
Support photo upload
To enable photo upload, you need to change the TYPE of the Photo column of Work Report to Image. ( Don’t forget to click the Save button if you change any settings. ) Then you will be able to upload photos with the Work Report editing form.

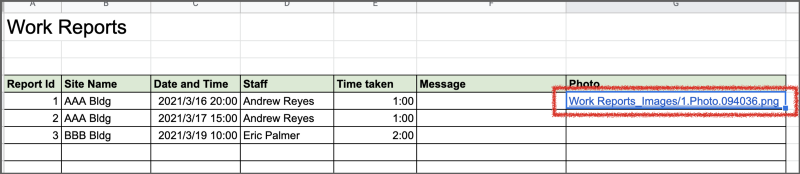
While Glide uploads photos to their own Google Cloud Storage, AppSheet uploads photos to your own Google Drive storage. Upload place is a folder that is the same as the data source spreadsheet. I like this behavior because I can easily control those photos. The relative path of the image is written in the Photo column in the record.

Disable unnecessary actions
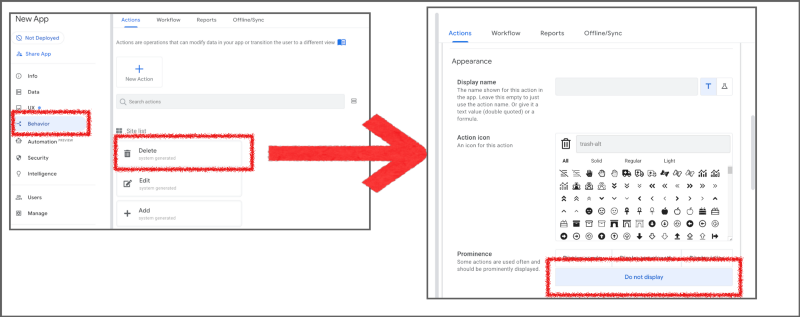
Unlike Glide, AppSheet makes Add, Update, Delete actions automatically. I like these behaviors too. However, there are not necessary actions; especially the Site list screen shouldn’t have these actions. So I removed these actions.
- Click Behavior of left side pane.
- If necessary, Click “Show system actions”.
- In the Site list area, Click Delete action. Then click Appearance and click “Do not display”.
- Do the same for Edit and Add actions.
- Click the Save button.
Limiting Users to Their Own Data
To do so, you can use Security Filters. Before using Security Filters, you had better set the Require user authentication option on the Security > Require Sign-In pane. Once a user signs in, AppSheet knows the user’s email address.
- The first step in preparation, I added a column ( named “Email” ) that contains individual emails to the “Site list” by using Google Sheets. And input an email address for the test.
- In the Data section, click Columns and click the “Regenerate Structure” button in the Site list area.
- Click Security of left side pane.
- Click the Security Filters tab.
- Click Security Filter of Site list and then “[Email] = USEREMAIL()” and Save.
- Then users are limited to access their own data.
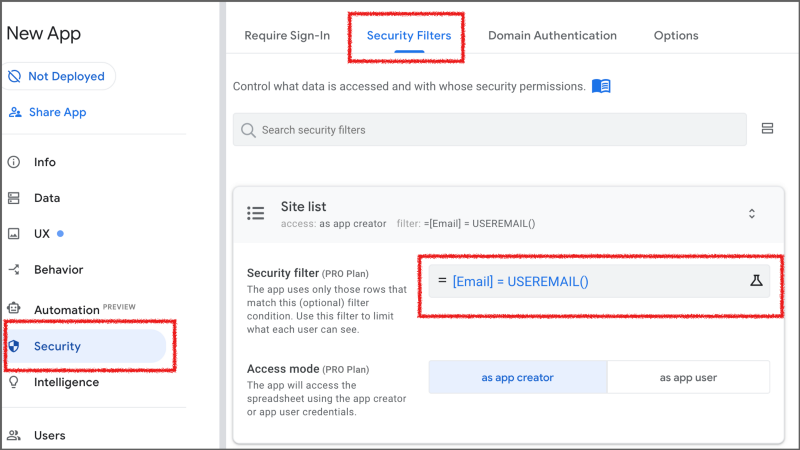
Note: Security Filter requires PRO plan ( $10/active user ).
Other things
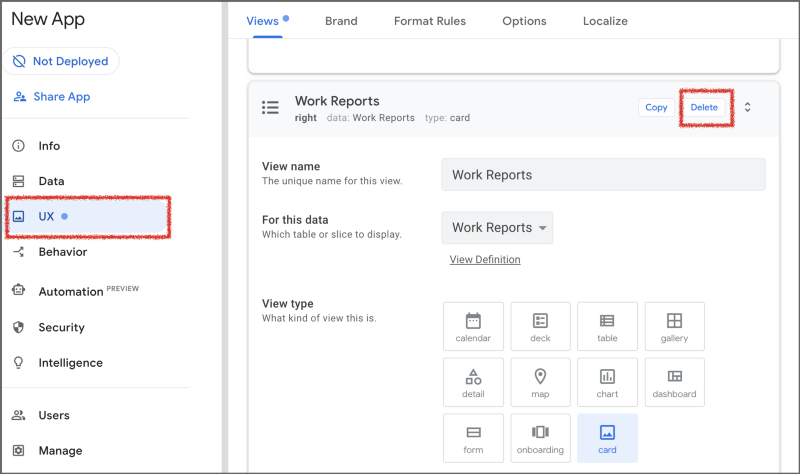
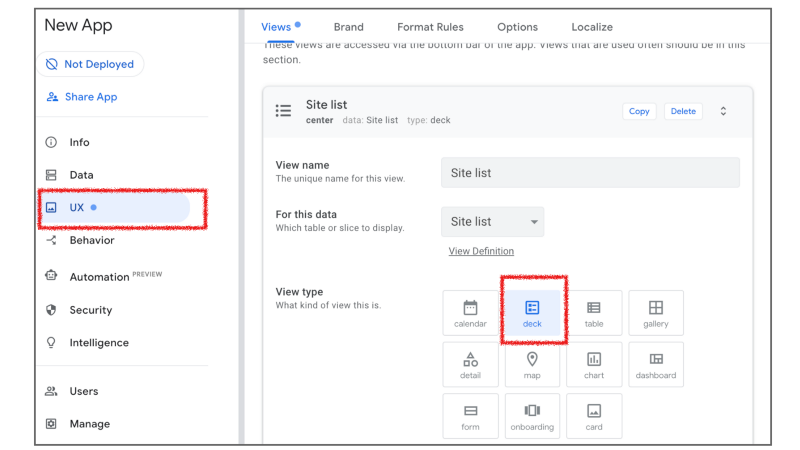
- Since we don’t need to open the Work Report screen directly, you can delete the screen in the UX pane.
- Strangely, the Site list screen shows images contained in the Work Report records linked to the Site list records. It is not necessary. So I changed the View type to “deck”. ( Actually, I couldn’t find how to remove the image view from the Site list screen. )
Publish the app
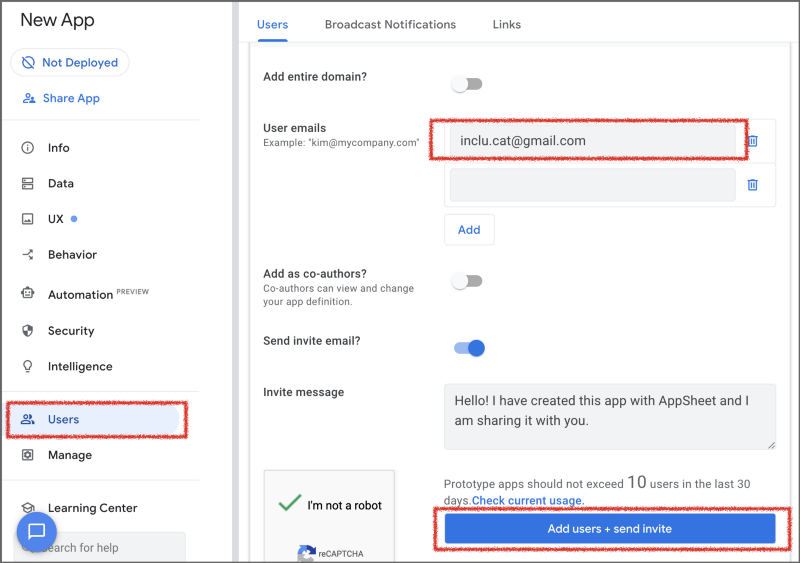
- Unlike Glide, AppSheet restricts access to users by default. So you need to add the users in the Users pane.
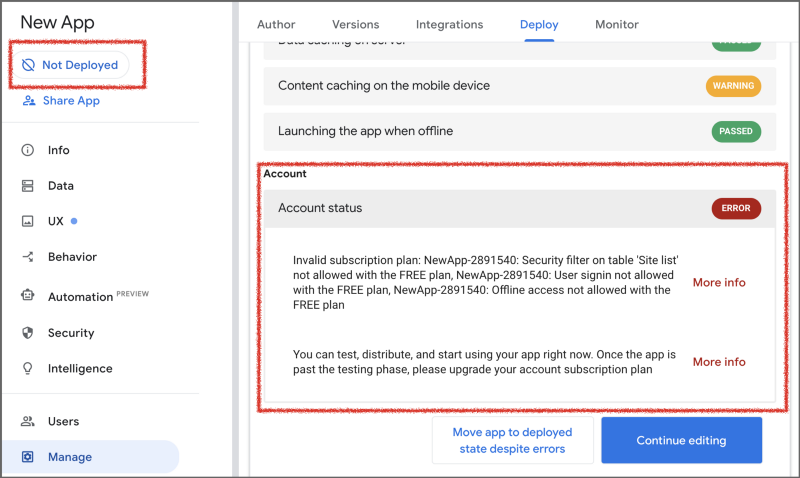
- To publish the app, you need to click “Not Deployed”. Then deployment check runs. In this case, my account status was the FREE plan, so that I couldn’t proceed with the deployment. Because I use the Security Filter function mentioned above, I need to get the PRO plan if I want to deploy. ( I decided to stop here)
Note: Whether you use Security Filter or not, you should upgrade your plan when you finish the testing and deploy.
Conclusion
AppSheet is a well-thought-out tool for building a no-code app. It has so many features and good written tech documents. Compared to Glide, AppSheet seems solid. However, there are a few things that bother me.
Expensive
To use the Security Filter feature, you should get at least the PRO plan. It costs $10/active user per month. If you have 20 active users, you should pay $200 per month. It is a little expensive.
Some bugs
When I made this app, I faced some strange behaviors on the AppSheet app view. Most of the cases were that the app view did not reflect the settings or showed empty when I the data settings, etc. It may have some bugs for now.
Restricted relation
Like Glide, AppSheet doesn’t have a way that one spreadsheet has relation with multi spreadsheets. In many cases, work reports are divided by each site, so if you use AppSheet and have to make something like printable reports, you have to get another mechanism for it.
AppSheet is a great supporter for system administrators working in small businesses despite some issues. I strongly recommend trying it with a simple app. I hope this article is helpful for you!
No responses yet